The Plow Stop (Snowplow)
Heel brake still shaky? The plow stop slows you down at low speed using your inside edges — both feet stay on the ground. An addition, not a replacement.
Introduction
Your heel brake still feels shaky, but you want a controlled way to stop at low speed? Here's the honest answer: learn the plow stop as well. Open your legs, push your heels outward, and brake on your inside edges — without lifting the wheels off the ground even once.
Remember the wedge turn from skiing? It's the exact same movement, just on wheels. The plow stop slows you down at low speed — as a beginner, it won't be enough for more speed, let alone on a slope. Still, for flat paths and your first weeks on skates, it's gold, because you never have to balance on one leg to use it. It doesn't replace the heel brake — it adds to it.
What You Need
- Full protective gear: a helmet, wrist, elbow, and knee guards — a must for beginners even at low speed.
- Flat, open terrain: paved, no slope, no traffic. An empty parking lot or schoolyard is ideal since you can focus fully on the movement instead of dodging obstacles.
- A feel for edges: you should already have forward gliding and light edging down, otherwise you're missing the base you need to put any pressure on the inside edge at all.
Step by Step
1. Warm Up With Swizzles
Before braking from full speed, train your edge control in isolation. Ride swizzles (also called lemons or the "rocking horse"): open your legs outward from the V-position, then pull your toes back together. That's exactly the feeling you'll need in a moment for braking pressure.
2. Form the Diamond
Glide forward slowly, drop deep into your knees ("ready stance"), and open your legs well past shoulder-width — your track should look like a diamond. Keep your weight centered.
3. Form the Plow
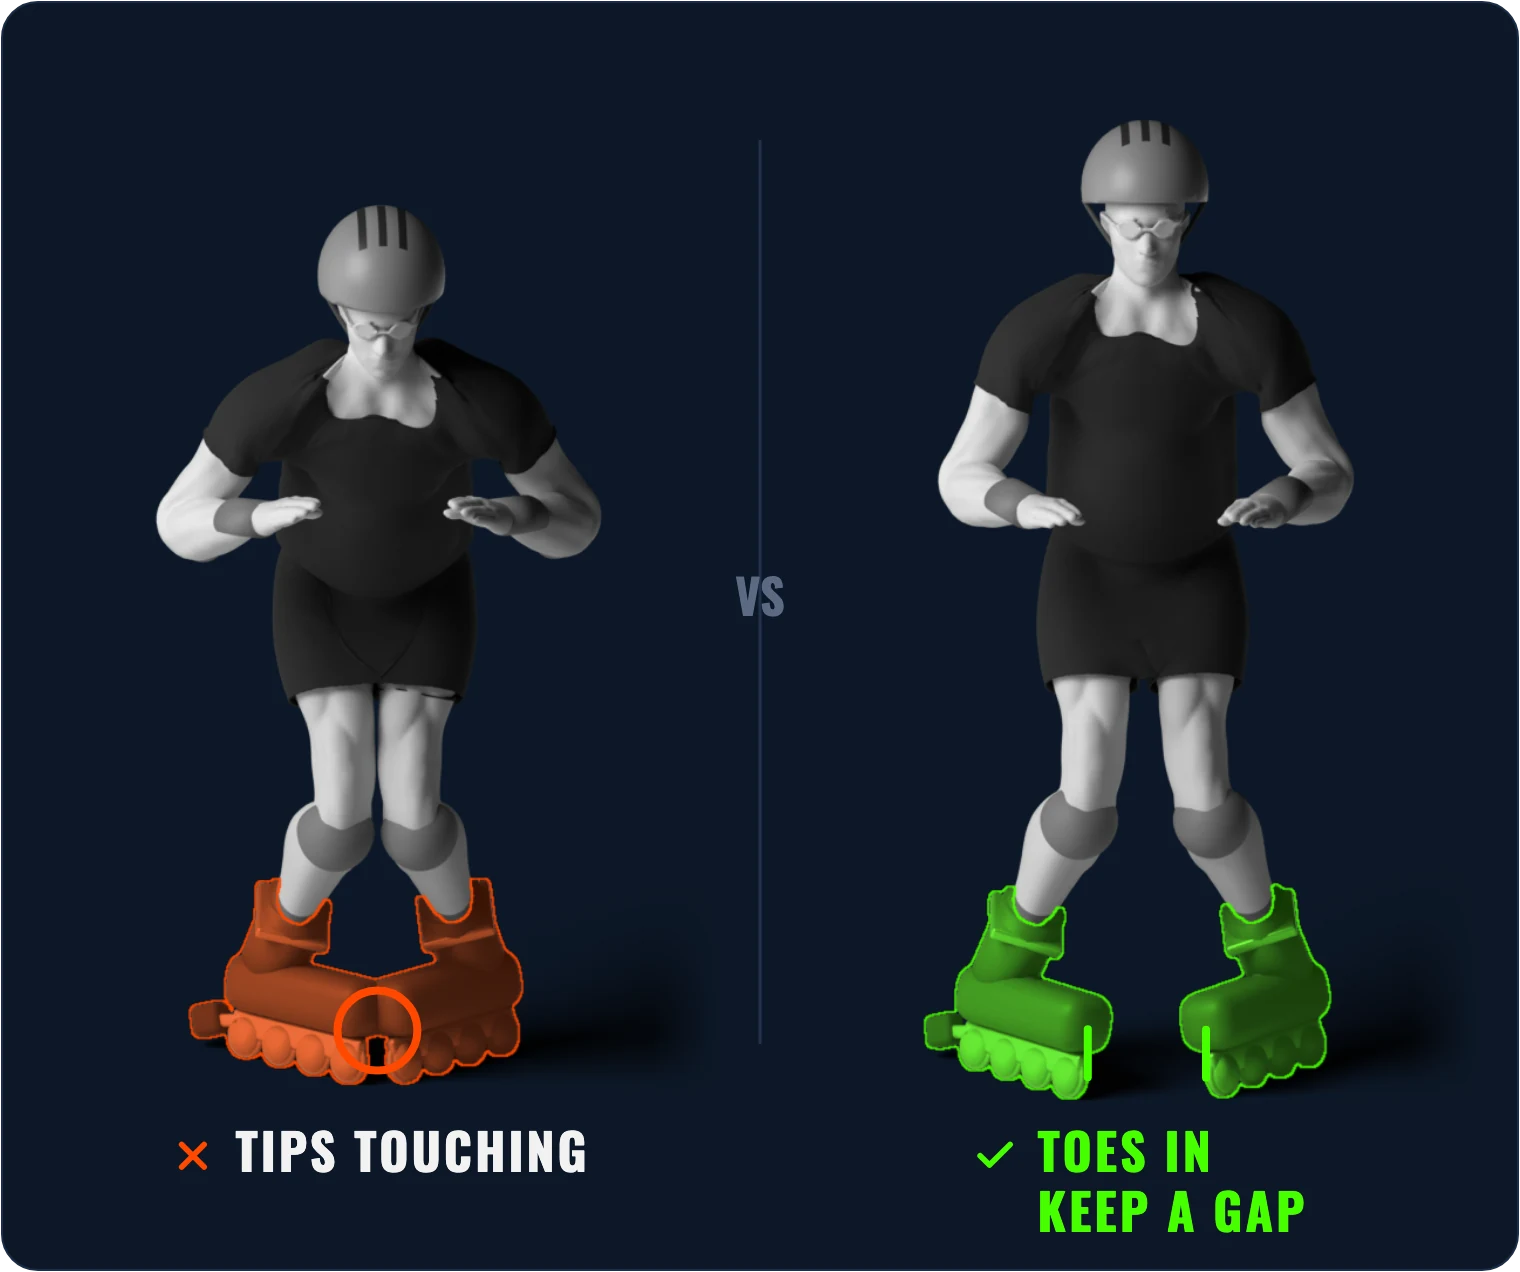
At the widest point of the diamond, turn your toes inward and actively push your heels outward — that's the plow. Keep your thighs tense: your toes can get close, but never touch or cross — otherwise you'll trip instantly.
4. Apply Edge Pressure
Now press onto your inside edges while holding the plow stance. Hips slightly back, weight behind the skates. The deeper your knees, the more pressure, the faster you stop.
Common Mistakes
- Using it at speed. As a beginner, the plow stop is only enough for low speed, not for rolling downhill. With too much speed, you just keep rolling.
- Locked-out knees. Stiff legs can't transfer pressure onto the inside edge. Bend deep so your inner thighs can act as leverage.
- Skates touching. Pull your toes together too aggressively and the front wheels collide — then you tip forward.
- Too narrow a diamond. Open your legs only a little and you barely get an edge angle, so you barely get any braking effect. Start a bit too wide on purpose and narrow the split as you get comfortable.
Safety Notes
The plow takes strength in your thighs. The most common fall: your toes run together and you tip forward over your skates. Stay low, hips slightly back, weight behind the skates — and remember our rule of thumb "Oh no, go low!" For your first few tries, practice slowly near a wall or railing you can briefly lean on if needed.
Pro Tip
Notice your braking power fading at slightly higher speed? Try the stepping plow: instead of holding rigidly in the diamond, take quick, alternating steps from side to side. This resets your braking pressure dynamically and makes it easier to stay balanced — basically the difference between a car parked with the brake locked and one rolling stop-and-go. Get comfortable with this variation and you're already halfway to the feel you'll need for the T-stop.
FAQ
Up to what speed does the plow stop work?
There's no fixed number. As a beginner, the plow slows you down at low speed; for more, it usually isn't enough. If you keep rolling despite the plow, that's your signal: for more speed, the heel brake is your tool. Experienced skaters can control faster rolling with the plow too — you'll get there with time.
What do I do if my skates touch each other while braking?
Pull your toes together less aggressively and always leave a small gap. If the front wheels touch, both skates lock up instantly and your upper body tips forward uncontrolled. Practice the plow stance slowly while standing still before using it in motion.
Plow stop or heel brake — which should I learn first?
They complement each other, but most people start with the heel brake because it still works at higher speed. The plow stop is worth adding as a second technique for low speed — it can't replace the heel brake.
Does the plow stop work downhill too?
As a beginner: no. On a slope your speed builds quickly, and an unpracticed plow isn't enough for that. At higher speed or on slopes, the heel brake is your tool — and you avoid slopes completely until it's solid. Experienced skaters do control slopes with the plow too, but that's a later step.
Why does my inner thigh hurt after practicing?
That's normal, and actually a good sign: those muscles (your adductors) hold the edge pressure in the split stance and get worked in an unfamiliar way for most beginners. Mild soreness after your first few sessions fades within one to two weeks of regular practice.
Key Takeaways
- The plow stop slows you down at low speed with both feet on the ground — as a beginner, it isn't enough for more speed.
- Braking pressure comes from your inside edges in the plow stance — deep knees are the key to it.
- At higher speed or on slopes, the heel brake is your tool — avoid slopes until it's solid.